Sharing modules across Android apps

While most android apps are created with a single default app module, in the last few years people have started moving to a multi module structure for their Android apps. Having multiple smaller modules have a few distinct advantages
- Build times are noticeably faster
- Your code is decoupled with clear dependencies
- Better distribution of ownership across different parts of the app
- Allows modules to be reused across apps
Example modules
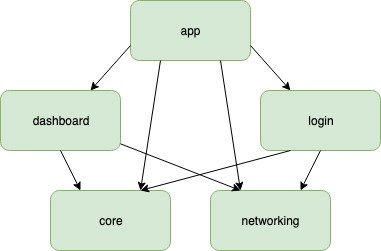
A possible strategy is to have one module per feature.
app: This is the main module which will be the entry point into your app. It acts mainly as a coordinator between other modulescore: This will contain the model definitions that are core to your app and will be required across modulesnetworking: This provides the networking code for the other moduleslogin: Login/Signup logic goes heredashboard: User dashboard will be here

There are many posts on the advantages and strategies for modularizing your Android apps. For this post, we will focus on the strategy to reuse modules across apps.
Reusing modules across apps
We have multiple apps in our company that share the core and login logic. So we decided to share these modules among the two applications.

One obvious way to share Android Library modules would be to share the generated .aar files and add them as dependencies to the different apps. While this is simpler, the main applications and the library modules will be different Android Studio projects. If any change needs to be done in the library, the .aar will have to be regenerated and manually updated. There has to be a better way.
The solution we decided to use for sharing modules is git submodules. Though it had an initial learning curve and a small overhead in bringing the entire team up to speed with submodules, it has worked exceptionally well for us.
In the above example, we have two git submodules, core and login.

And the submodules will be added as dependencies just as any Android module,

Creating new submodules
To create a new submodule, we follow the following process
- Create an empty repo on Github and initialize with a README
- Add a new submodule to our app git submodule add git@github.com:username/core.git
- Create a new Android Library module in the new directory
- Commit the changes in the library module and push
- Commit the changes in the main repo and push
Next time we need to use this submodule in another app, we only need to
- Add a new submodule to our app git submodule add git@github.com:username/core.git
- Add the newly added module to settings.gradle and a dependency in build.gradle
Committing changes to a submodule
Every time we make some changes to a submodule, we just need to make sure that we commit and push those changes before committing the changes in the main repo.
Submodule:
- If you are on a detached head,
git checkout -b new-branch git add . && git commit -am "commit message"git push origin new-branch
Main repo:
git add . && git commit -am "commit message"git push
Fetching remote changes
Every time we do a git pull, we just need to remember to update the submodules as well
git submodule update
and that’s it. We have the latest version of the submodule locally!
Hope this works for you.
Happy coding!